ATLASTM Microbiome Kit
FOR EXTERNAL USE ONLY. DO NOT drink, touch, or remove the reagent from the tube. If reagent contacts skin: wash with soap and water. If it contacts eyes: flush immediately with water. If the tube is spilled or visibly damaged, do not use it — contact Metaboly for a replacement kit.
Your kit contains a pre-filled DNA/RNA Shield™ Fecal Collection Tube. The preservation reagent inside immediately stabilizes microbial DNA and RNA at the moment of contact, halting bacterial growth and preventing the community shifts that occur when feces are left unpreserved. Once the sample is mixed with the reagent, it is stable at room temperature during transit — no ice pack or refrigeration is needed.
The equine hindgut harbours one of the most complex microbial ecosystems of any mammal. Because this community begins to change within hours of defecation — driven by fast-growing environmental bacteria — timing and technique matter. Following these instructions carefully ensures your horse's sample accurately reflects their true gut microbiome.
Kit storage: Keep the unopened tube at 5–30°C until use. Shelf life is up to 24 months from the manufacturing date on the label.
CHECK Your Kit Contents
Confirm all items above are present. Inspect the collection tube — it should not be visibly cracked, leaking, or have a compromised seal. Contact Metaboly before proceeding if anything is missing or damaged.
IDENTIFY and ISOLATE Your Horse
- •Confirm you are collecting from the correct horse before proceeding.
- •If your horse is kept with others, briefly isolate them in a stall or paddock to ensure you collect the right animal's manure and to make it easier to observe a fresh defecation.
- •One tube per horse: never combine or share samples between animals, even if they are from the same barn.
LINK Your Collection Container
Each tube has a unique RTX-code (a 12-digit number) printed on the label. You must link it to your horse in the portal before returning the sample — unlinked samples cannot be processed.
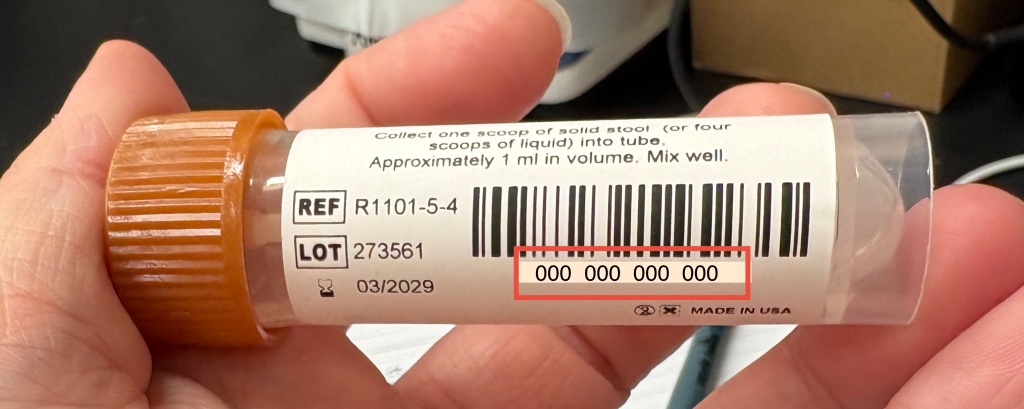
- •Log in to your Metaboly portal and click "Link Kit" in the top bar.
- •Enter the RTX-code, the exact date and time of collection, and the horse you are collecting for.
- •Answer every prompt: the portal will ask about your horse's health status, current medications, diet, recent treatments, and other context. Do not skip any fields. This information is how our laboratory distinguishes true microbiome signals from expected responses to illness, treatment, or environment — and it directly determines the accuracy and relevance of your report.
- •Click Save.
TIME Your Collection
Timing is the single most important factor in fecal microbiome quality. Research on equine fecal microbiome sampling has shown that the bacterial community begins to shift within 2 hours of defecation at barn temperatures, and becomes dominated by fast-growing environmental "bloom" bacteria (particularly Bacillaceae and Enterococcaceae) by 6–12 hours. These bloom organisms are not representative of the hindgut and will reduce the accuracy of your results.
- •Ideal: collect immediately after defecation — within 15–30 minutes if possible.
- •Acceptable: within 2 hours of defecation.
- •Maximum: do not collect from manure that has been sitting for more than 2 hours, especially in warm conditions.
Best strategy — stalled horses: Early morning is ideal. Check on your horse shortly after feeding, when defecation is most likely. If you can observe the horse directly and collect immediately after defecation, this gives the best results.
Best strategy — pasture horses: Bring the horse into a stall or paddock the evening before. Collect the first fresh pile in the morning, as soon as possible after passing.
Do not collect from the stall floor without confirming the manure is fresh. Old piles, even if they look intact, may have been sitting for hours and will not yield reliable microbiome results.
COLLECT the Sample
- •Put on the provided gloves.
- •Choose the right part of the pile: Collect from the interior of a freshly passed bolus — break open a fecal ball and scoop from the inside. The interior is more representative of hindgut contents and less exposed to environmental contamination than the outer surface. Either approach (surface or interior) is scientifically acceptable, but interior sampling is preferred when possible.
- •Use a clean surface: collect onto a clean, dry surface if possible (e.g. a clean piece of cardboard or directly into the provided collection bag). Do not allow the sample to contact soil, grass, bedding, or standing water.
- •Avoid the ground layer: do not scoop from the very bottom of the pile, where contact with ground, bedding, or moisture is greatest.
- •Do not mix samples from different horses.
Do not add water or any liquid to the sample before loading it into the tube.
LOAD the Collection Tube
- •Unscrew the collection tube cap and set it aside without touching the inside.
- •Use the built-in spoon to scoop one level spoonful of feces from your collected sample — approximately 1 gram (about the size of a marble or a level teaspoon). Do not overfill.
- •Lower the spoon and sample into the collection tube.
- •Foaming is normal: the reagent may foam or froth on contact with feces. This is expected and does not affect the sample.
MIX and SEAL
- •Tighten the cap firmly.
- •Invert the tube 10 times to mix the sample thoroughly with the preservation reagent. This ensures complete stabilization.
- •Partial suspension is fine: some fecal material may not fully dissolve. As long as the material is submerged in the liquid reagent, the sample is stabilized and ready for transport.
- •Once mixed, the sample is stable at room temperature (5–30°C). No refrigeration or ice is required.
PACK for Transport
- •Place the sealed tube inside the biohazard transport bag and seal it securely.
- •The DNA/RNA Shield™ reagent preserves the sample at ambient temperature — no ice pack is required.
- •Place the transport bag inside the return mailer.
- •Returning an ATLAS tube with an FEC sample? It is fine to ship both in the same mailer with an ice pack. Load in the following order: ice pack first, then FEC sample, then ATLAS tube.
- •Wash your hands or use the provided hand wipes.
RETURN Your Sample
All kits include a pre-paid UPS return label. Drop off at any UPS Access Point™ or The UPS Store®, or schedule a pickup at your address at ups.com/schedule-pickup.
Questions about collection? Contact us before submitting your sample. Reach out here →